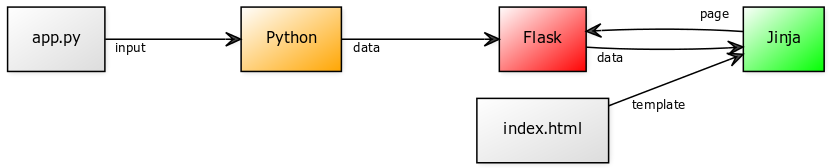
Templates help you reuse visuals. In all web apps, the visuals are reused. This helps you divide the business and presentation logic. You don't want your app code mixed with graphical design code.
Imagine an analytics app. You'd want the same navigation and footer on every page. The contents may differ, but the general design stays the same. That's done with templates.
Practice now: Test your Python skills with interactive challenges
template example
The first thing you want to do is create a directory for your templates. You can do this from the terminal with the command below. If you haven't done so, create an app. Assuming your project directory is named 'app',
(venv) $ mkdir app/templates
A single template is just a file. Each template contains HTML code, this is the standard language for the web.
flask template variable
Lets create the file index.html
<html>
    <head>
        <title>{{ title }}</title>
    </head>
    <body>
        <h1>Hello {{ username }}</h1>
    </body>
</html>
Most of it are HTML tags (between the < and > symbols), which is standard on the web.
So what are those {{ and }} symbols?
This is how you can show Python variables on a webpage. They are placeholders for variables to be shown.
In this template there are two variables that can be passed, title and username.
template render
One of the key things to know is, templates are used to separate bussiness logic from presentation logic. This increases maintainability, extensionability and portability of your software.
Varibles can be passed from your Python code. Python needs to render templates, so import the module for that.
from flask import render_template
Change the original code:
@app.route('/')
def index():
    return 'Web App with Python Flask!'
Into one that renders the template and passes variables:
@app.route('/')
@app.route('/index')
def index():
    name = 'Rosalia'
    return render_template('index.html', title='Welcome', username=name)
Then start the app:
sudo python3 app.py
It will then show some text in the terminal:
 * Serving Flask app "app" (lazy loading)
 * Environment: production
   WARNING: This is a development server. Do not use it in a production deployment.
   Use a production WSGI server instead.
 * Debug mode: off
 * Running on http://0.0.0.0:81/ (Press CTRL+C to quit)
And open the url shown in the terminal in your web browser.
render_template
In the above example, you called the function render_template(). Why call this method and not return html data immediately?
Flask is bundled with a language named Jinja2. This gives you the power to include variables, create loops and add if statements right in the template.
You already saw how to include variables like title and username in the above example. So how do you include loops and if statements?
flask template if
You can include if statements in your template. The same operators that you would use in Python can be used (==, >, <, >=, <=,). A clause like else or elif can be used also.
In this code, the output will differ depending on the input variable username. The username is passed in the Python code (business logic) to the template (presentation logic).
<html>
    <head>
        <title>{{ title }}</title>
    </head>
    <body>

        <h1>Hello my love</h1>

        <h1>Hello {{ username }}</h1>

    </body>
</html>
flask template for loop
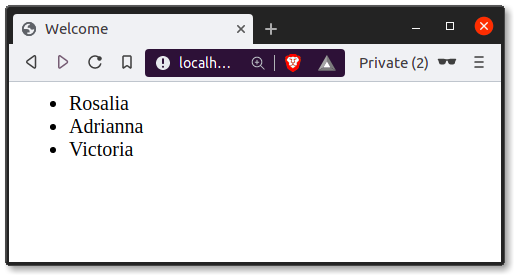
If you have a bulk of data, like a list of users, you want to use a for loop to iterate over it. Change the Python code to this:
@app.route('/')
@app.route('/index')
def index():
    users = [ 'Rosalia','Adrianna','Victoria' ]
    return render_template('index.html', title='Welcome', members=users)
The code includes a list (users). That list is passed to the render_template function. In the template, you can use a for loop to iterate over the list.
<html>
    <head>
        <title>{{ title }}</title>
    </head>
    <body>
        <ul>

        <li>{{ member }}</li>

    </ul>
    </body>
</html>
For code the tags {% and %} are used.
To display variables, write the tags {{ and }}.